

ChatGPT apps are about to be the next big distribution channel: Here’s how to build one
A step-by-step guide to jumping in and building your first ChatGPT app

👋 Hey there, I’m Lenny. Each week, I tackle reader questions about building product, driving growth, and accelerating your career. For more: Lennybot | Lenny’s Podcast | How I AI | Favorite AI and PM courses | Favorite communication course
Subscribers get 19 premium products for free for one year: Lovable, Replit, Gamma, n8n, Bolt, Devin, Wispr Flow, Descript, Linear, PostHog, Superhuman, Granola, Warp, Perplexity, Raycast, Magic Patterns, Mobbin, ChatPRD, and Stripe Atlas (terms apply). Subscribe now.
My many-time collaborator—and author of my 2nd and 12th most popular posts of all time—is back, and it’s a banger. If you’re looking for alpha in growing your product, this post is for you. I’ll keep my intro short and get you right into the post.
For more from Colin, find him on LinkedIn, check out his killer course (get 15% off using that link!), and join this free Lightning Lesson on January 30th to get a hands-on, live look at building your first ChatGPT app.
A few months ago, if you asked ChatGPT to help you book a flight to Paris, you’d get a helpful list of recommendations: airline breakdowns, price ranges, maybe some tips on timing. Then you’d leave ChatGPT, open a travel site, and start your search from scratch.
Now you can say, “Help me find a good flight to Paris from Toronto,” and an interactive widget appears directly inside your conversation. You browse flight options, compare prices, and book, all without ever leaving the chat.
The strategy is simple: instead of ChatGPT responding with text and sending the user elsewhere, it will now surface interactive widgets from third-party apps directly in a conversation, letting users transact inside of ChatGPT (and over time, OpenAI will likely take a small percentage of the transaction).
Launched in October at Dev Day, partners for ChatGPT’s apps already include large companies like Adobe, DoorDash, Canva, Figma, Booking.com, Coursera, Expedia, Spotify, and Zillow. Some of the biggest companies in the world are betting that chat will become a primary interface for their products.
ChatGPT apps represent a rare distribution opportunity, the kind that comes around once or twice a decade. The last comparable moments were the App Store in 2008, the rise of SEO in the early 2000s, and maybe Shopify’s app ecosystem. When a new distribution channel opens up at scale, the companies that move early capture habits that are hard to break later. This creates opportunity at both ends of the spectrum. For enterprises, ChatGPT apps are a new distribution channel alongside your existing ones. For solopreneurs, this is a chance to build microapps and get distribution without a marketing budget. The barrier to entry is low (a few weeks to build a simple app), but the reach is enormous.
In this post, I’ll break down how users find and use your apps, how these apps work behind the scenes, and how to create your own first ChatGPT app. Let’s build.
How users find and use ChatGPT apps
ChatGPT apps introduce interaction patterns that differ from traditional app stores. In most app stores, you have to find the app, install it, and only then you can use it. ChatGPT does support this pattern, but the more interesting pattern is contextual surfacing. In the near future (and something most people don’t fully grasp), ChatGPT will automatically suggest apps based on a user’s conversation. Ask about travel plans, and Expedia appears. Mention that you need a design, and Canva surfaces. Ask about ordering groceries, and an Instacart cart shows up. A user doesn’t need to know what apps are available; the model matches their intent to relevant tools. This has the potential to be a new and massive growth channel for products.
ChatGPT apps can appear in three formats, and as an app builder it’s important for you to consider which format would match the type of app experience you want to create for the user. I’ll say more about this in a bit, but each type leverages the Model Context Protocol (MCP) to deliver your app to ChatGPT.
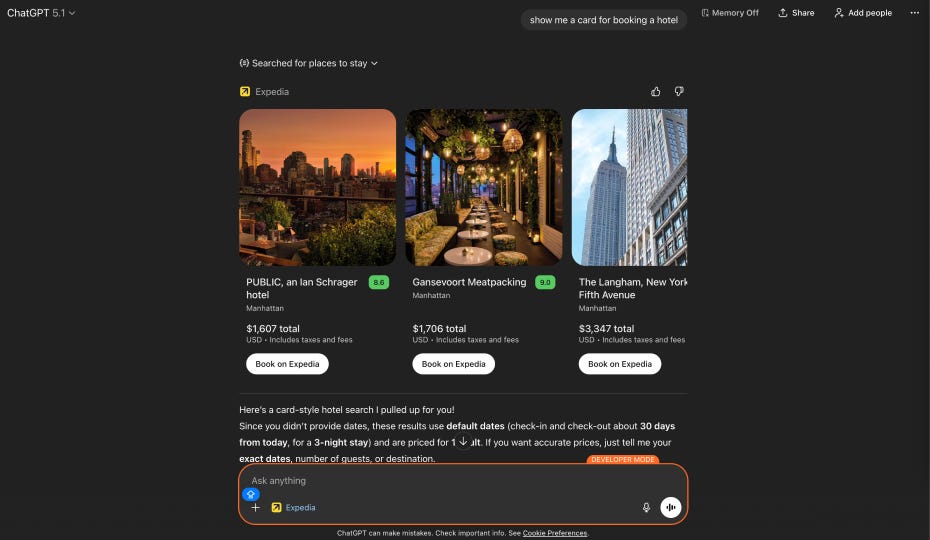
Inline mode embeds cards and lists directly in the conversation flow. This is the default, and it works well for product listings, search results, or any content that fits naturally alongside ChatGPT’s responses. Here’s a quick example of hotel listings from Expedia:
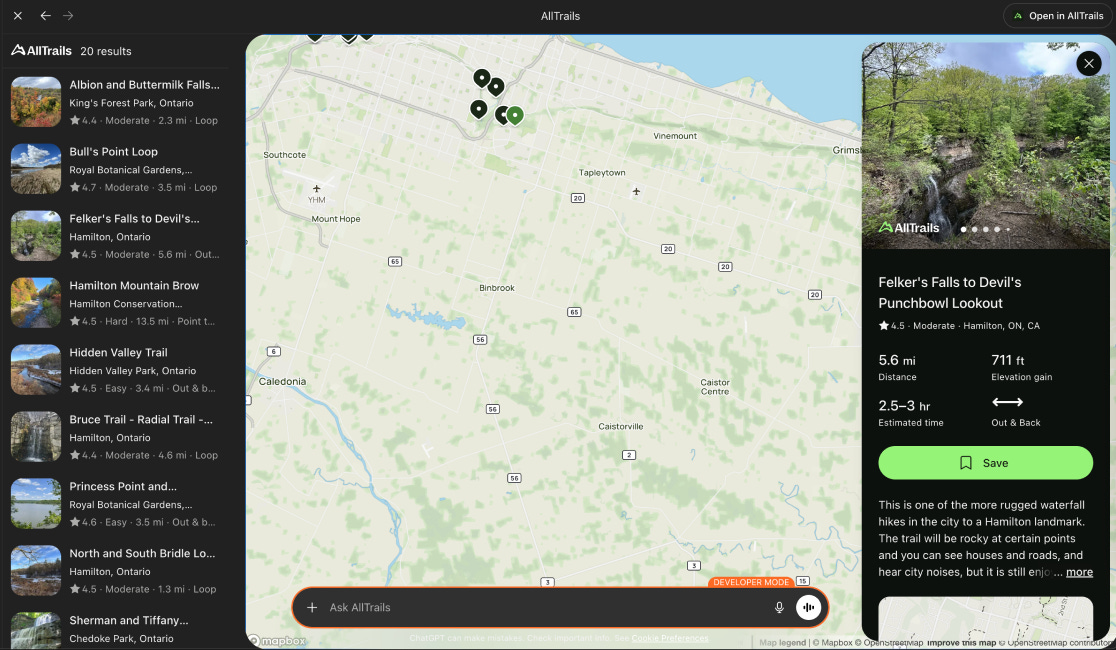
Fullscreen mode takes over the entire screen. This is best for maps, dashboards, or complex workflows that need more space. When a user is browsing AllTrails on a map or editing a design in Canva, full screen gives them room to work.
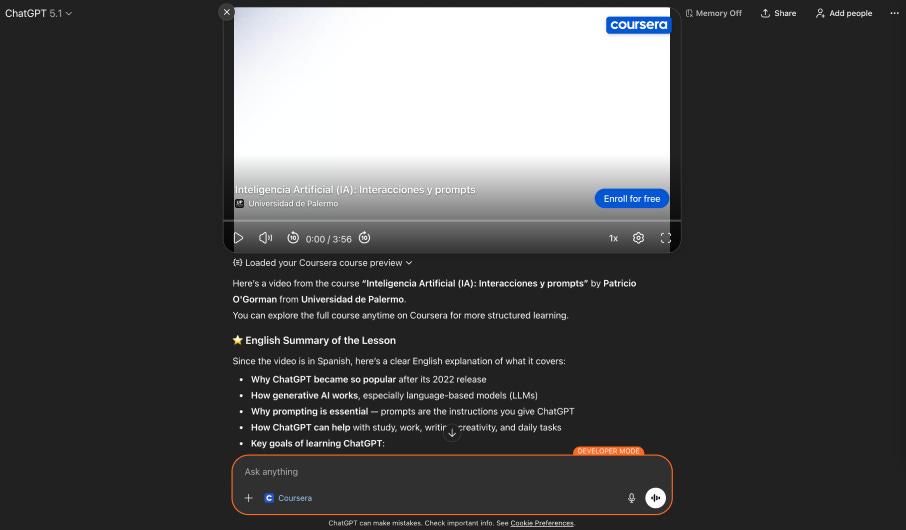
Picture-in-picture mode keeps a small floating window visible while the user chats. This is ideal for music players, timers, or anything a user might want to keep running in the background while they work on something else. Here, Coursera is playing a video while I continue chatting.
There’s one important constraint to understand: one widget per message. If the user says, “Book a restaurant and order an Uber,” ChatGPT can show only one app at a time. This means users work sequentially through multi-step tasks rather than in parallel.
How it works behind the scenes
When you’re preparing to build a ChatGPT app, it’s important to first understand the architecture.
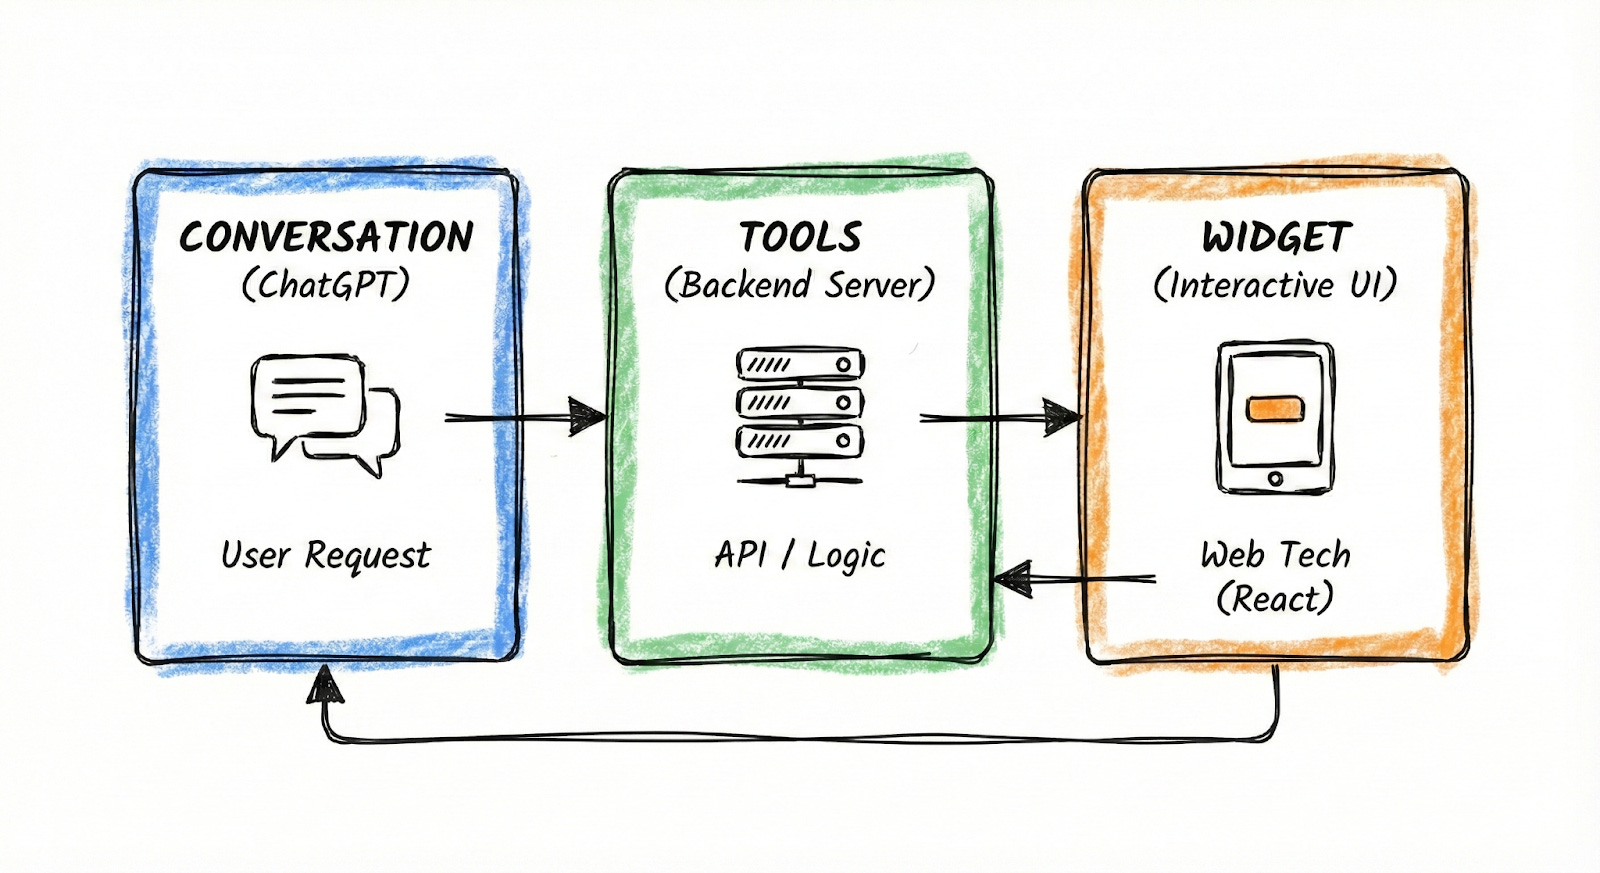
Every ChatGPT app has three parts:
The conversation within ChatGPT: The model interprets the user’s request and decides whether an app would be helpful.
The app’s “tools”: A backend server and API tells ChatGPT what the app can do.
The user-facing widget: This appears in the user’s chat, built with web technologies (typically React) and runs in a secure sandbox inside ChatGPT.
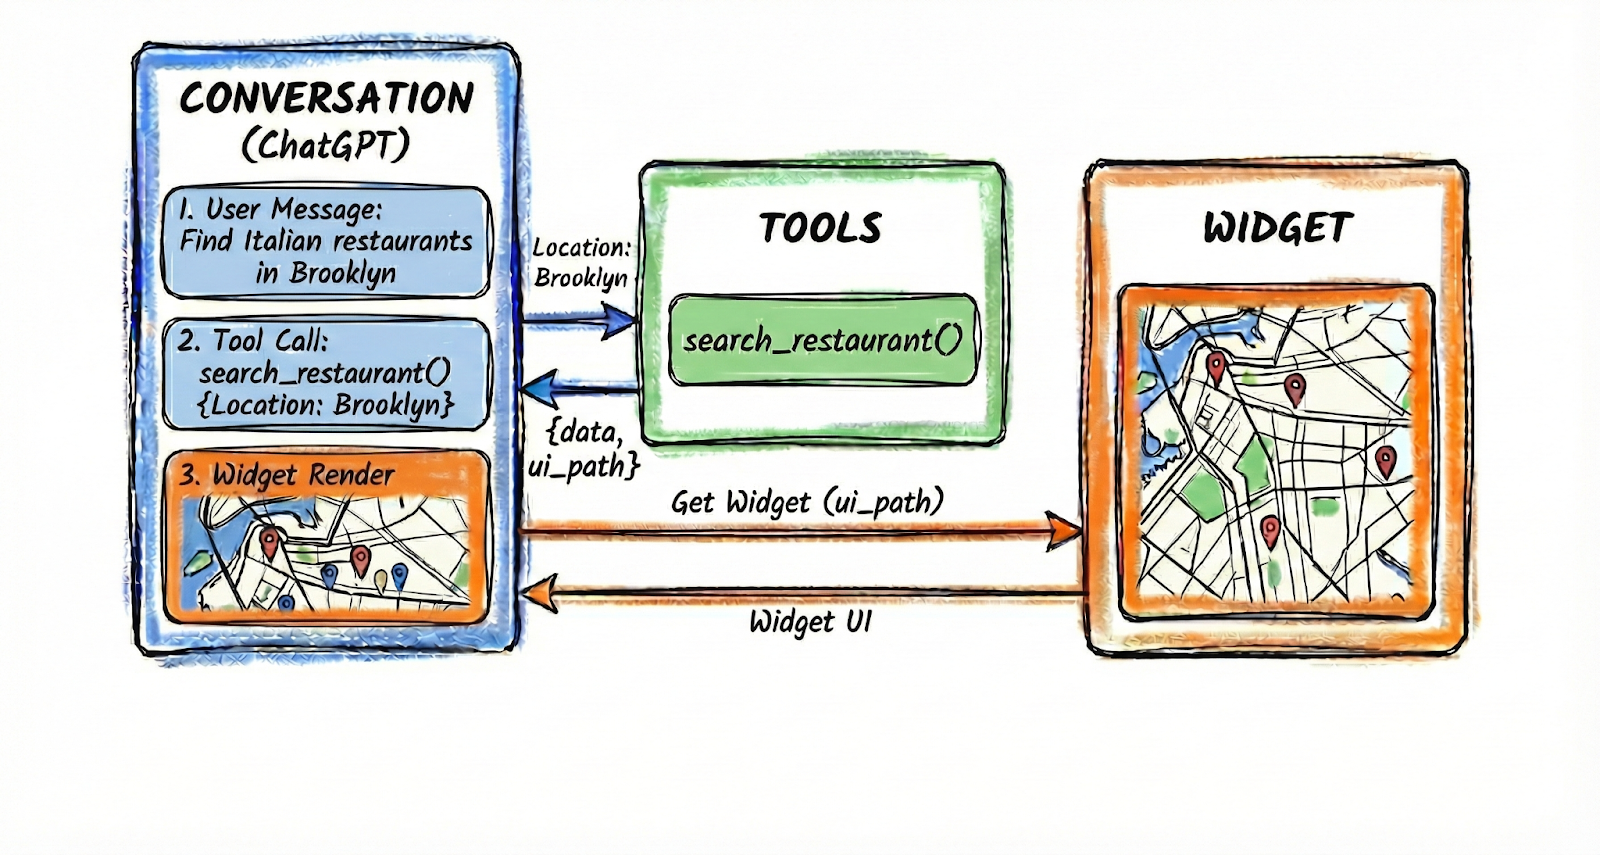
Let’s dig into #2, the app’s tools, because that’s the core of how this works. A tool is just a function that ChatGPT can call. When you build an app, you define tools, like search_restaurants, book_ticket, or create_playlist. Each tool has a name and description that helps ChatGPT understand when to use it and what parameters it accepts. When a user says something relevant, ChatGPT reads these descriptions and decides which tool to call.
Here’s the flow: The user says, “Find me Italian restaurants in Brooklyn.” ChatGPT looks at the available tools, sees one called search_restaurants with a description like “Search for restaurants by location and cuisine” and calls it with {location: “Brooklyn”, cuisine: “Italian”}. Your server runs the search, returns the results, and can optionally include a widget to display them. ChatGPT renders the widget in the chat with the user.
The user interacts with the widget—say, by clicking on a restaurant to reserve it. That click can trigger a follow-up tool call. Your widget then sends a message back to ChatGPT saying, “User selected restaurant_id: 1241,” and ChatGPT can call another tool, like book_reservation(), to save their reservation. The conversation continues, with the widget and the AI working together.
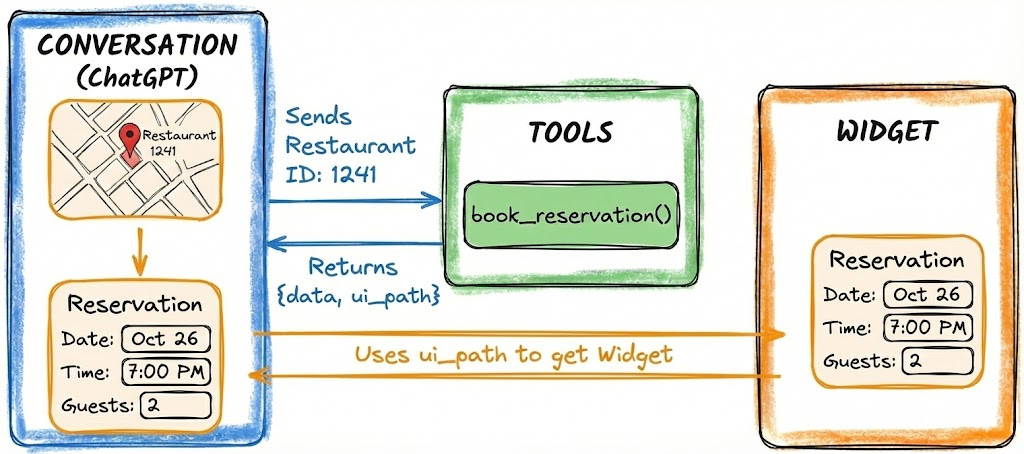
This creates a loop: user says something to ChatGPT → ChatGPT calls a tool → widget renders → user interacts with widget → ChatGPT calls another tool. The key insight is that ChatGPT orchestrates the whole thing. It decides when to call tools, what parameters to pass, and how to respond to user actions. Your app just exposes capabilities and renders UI.
MCP is the infrastructure connecting all of this. MCP is very similar to APIs (I covered those here), but rebuilt for AI agents. It provides a universal way to connect apps to AI assistants. Anthropic created MCP in November 2024, and OpenAI adopted it across ChatGPT and their developer tools in March 2025. In November, both companies announced they’re collaborating on MCP Apps, a standardized way to add interactive UIs to the protocol.
If you’ve heard of AI agents, this might sound familiar. ChatGPT apps and AI agents share the same core pattern: an AI model that can call external tools to accomplish tasks. The difference is who’s running the show. When you build your own AI agent, you control everything—the model, the prompts, the orchestration logic, the error handling. You decide when tools get called and how results are processed.
As you may have been thinking as you read this, tools also represent a new form of SEO (or is it AEO?). Based on your tool’s name and description, ChatGPT can suggest your app to users to help solve their needs, like creating a slide deck or generating a financial model. Having accurate tool descriptions that uniquely identify your app will help ChatGPT users find and use your app in the correct contexts.
Building your first ChatGPT app
Now that you understand the basic structure, you can have an app built in 30 minutes or less by following this guide.
Option 1: Replit
The Replit agent is not an expert on ChatGPT apps, so the easiest way to get started in Replit is to import an existing app. I’d recommend the official examples from OpenAI. To save some time, I created a Replit project you can duplicate with all of the following steps completed, here. I’d highly recommend using my project; it will likely save you at least 30 minutes.
If you’d prefer to start from scratch, head to Replit, select “Import from GitHub,” and paste in this URL: https://github.com/openai/openai-apps-sdk-examples
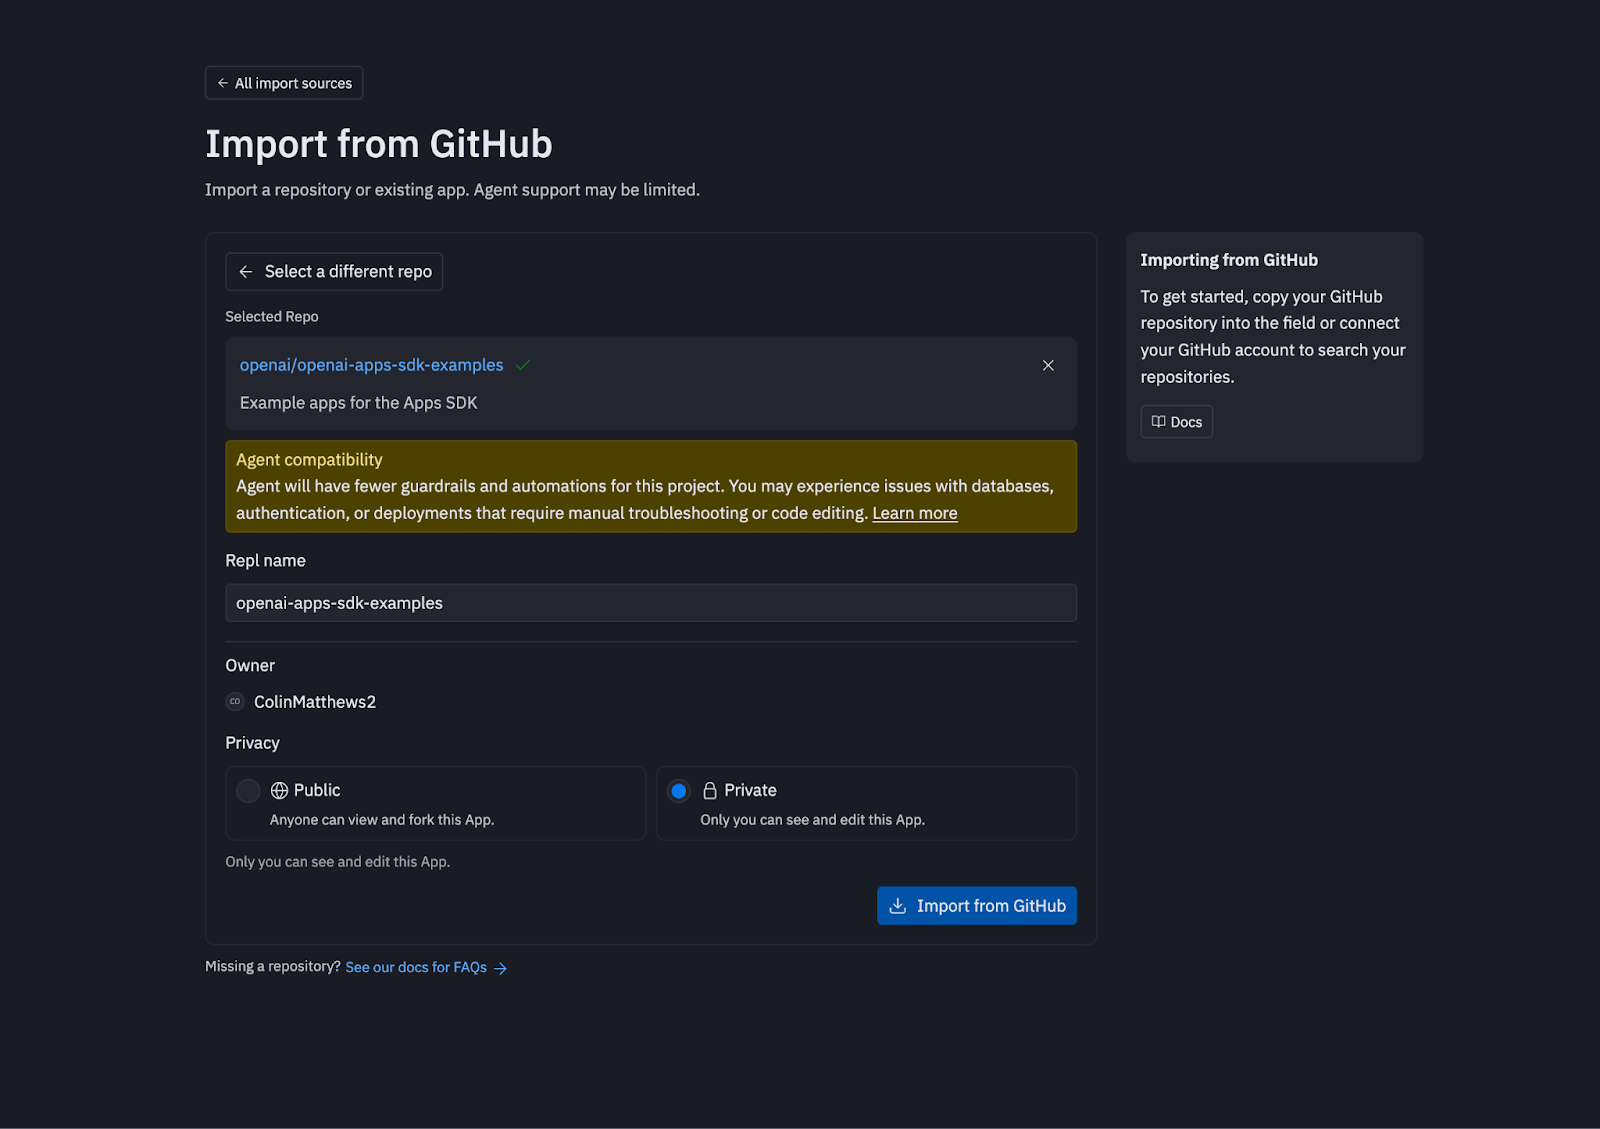
The Replit agent will then do some work to set up your project—it should take 5 to 10 minutes.
Once you have the project running, you should prompt the following:
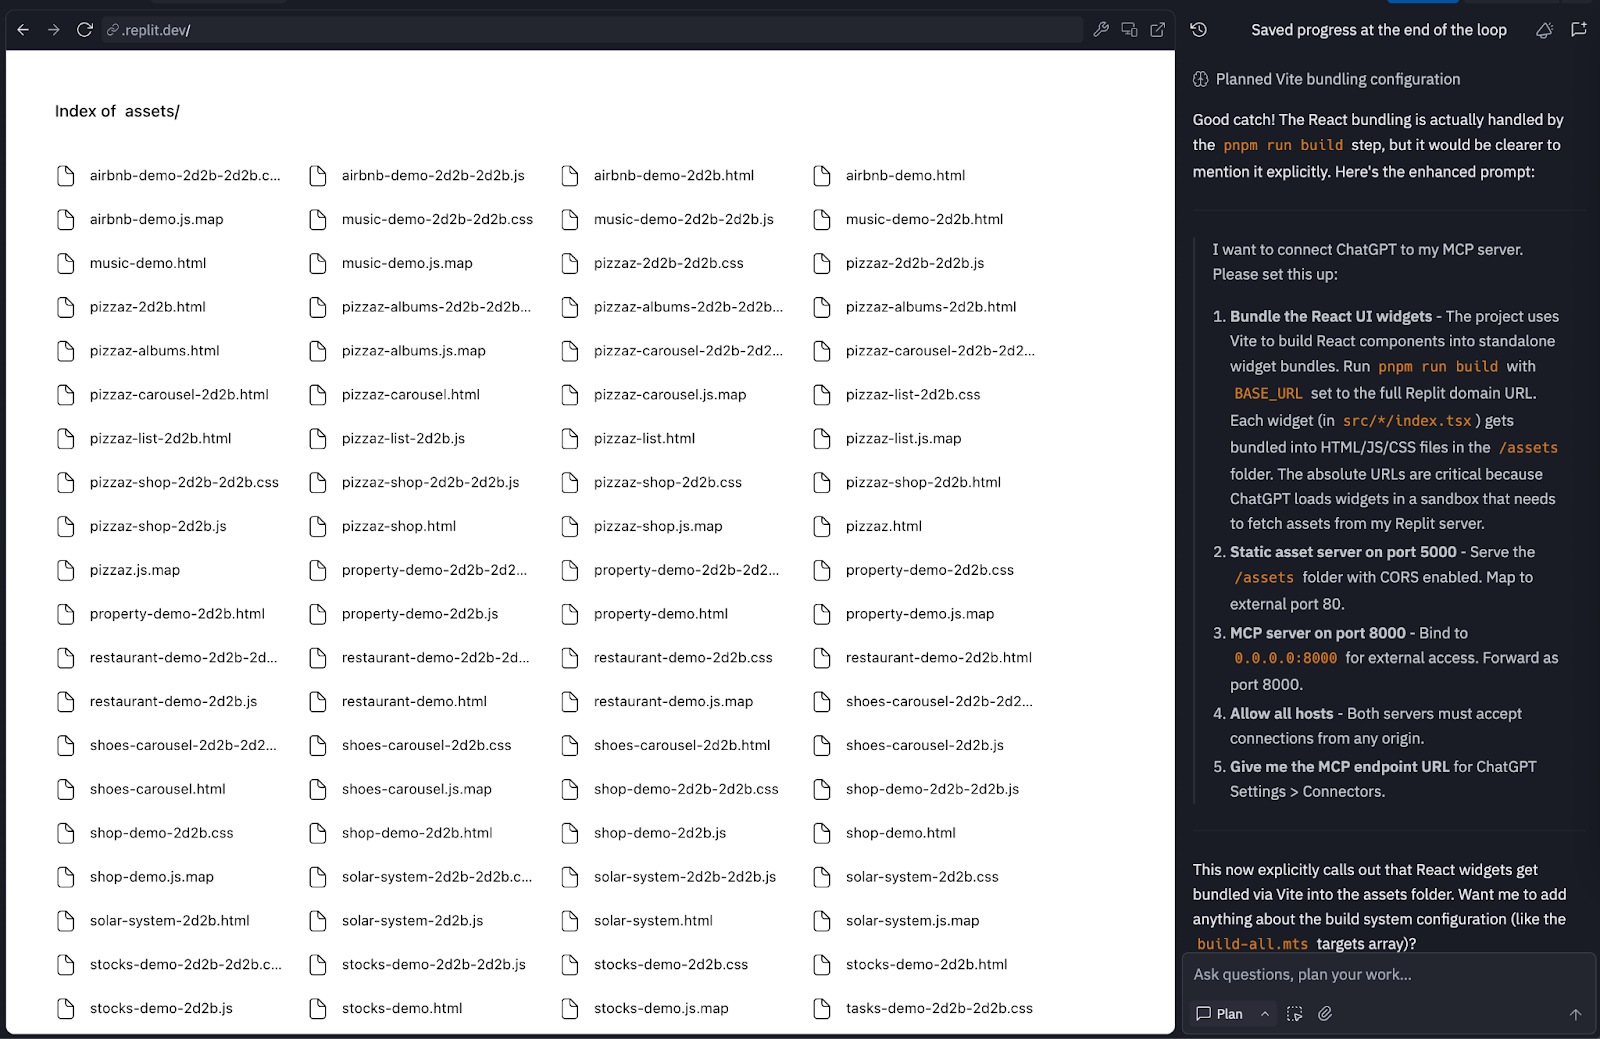
I want to connect ChatGPT to my MCP server. Please set this up:
Bundle the React UI widgets - The project uses Vite to build React components into standalone widget bundles. Run pnpm run build with BASE_URL set to the full Replit domain URL. Each widget (in src/*/index.tsx) gets bundled into HTML/JS/CSS files in the /assets folder. The absolute URLs are critical because ChatGPT loads widgets in a sandbox that needs to fetch assets from my Replit server.
Static asset server on port 5000 - Serve the /assets folder with CORS enabled. Map to external port 80.
MCP server on port 8000 - Bind to 0.0.0.0:8000 for external access. Forward as port 8000.
Allow all hosts - Both servers must accept connections from any origin.
Give me the MCP endpoint URL for ChatGPT Settings > Connectors.
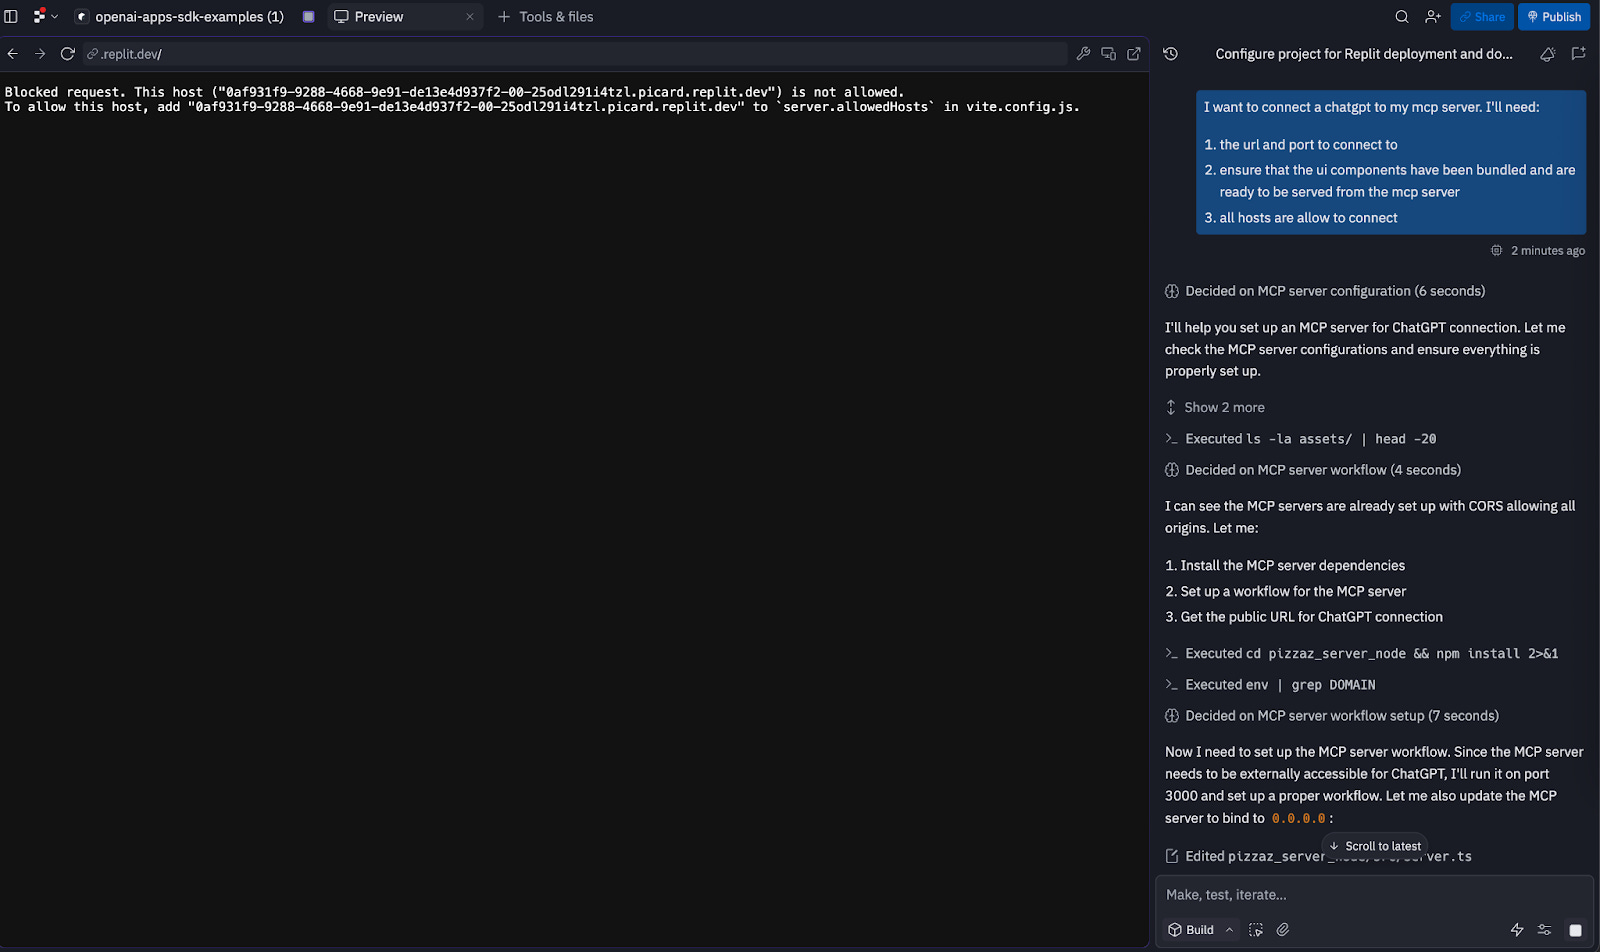
You may see a screen that appears to be an error, like the screenshot below. Replit is not built to preview MCP tools, so you’ll only be able to see the UI components once you’re connected to ChatGPT. Allow Replit to continue working until it has set up the MCP server correctly.
Eventually the Replit agent should tell you it’s ready. Common issues include misconfiguring ports and not being able to serve static assets, so follow up on these as needed. When ready (or if you copied my project), you should be presented with a screen like this:
We’re now ready to connect to ChatGPT. Ask the agent, “What is the external MCP URL for this app?” This should provide a URL like https://b3c4d0a4-6bdc-4926-b55e-5f94c6246e1e-00-1uvko22a6cltw.spock.replit.dev:8000/mcp.
To connect to ChatGPT, you will first need to enable Developer Mode on your ChatGPT account. From there, you can navigate to Settings -> Apps & Connectors -> New App. Paste your URL in this modal with a name (e.g. Replit App).

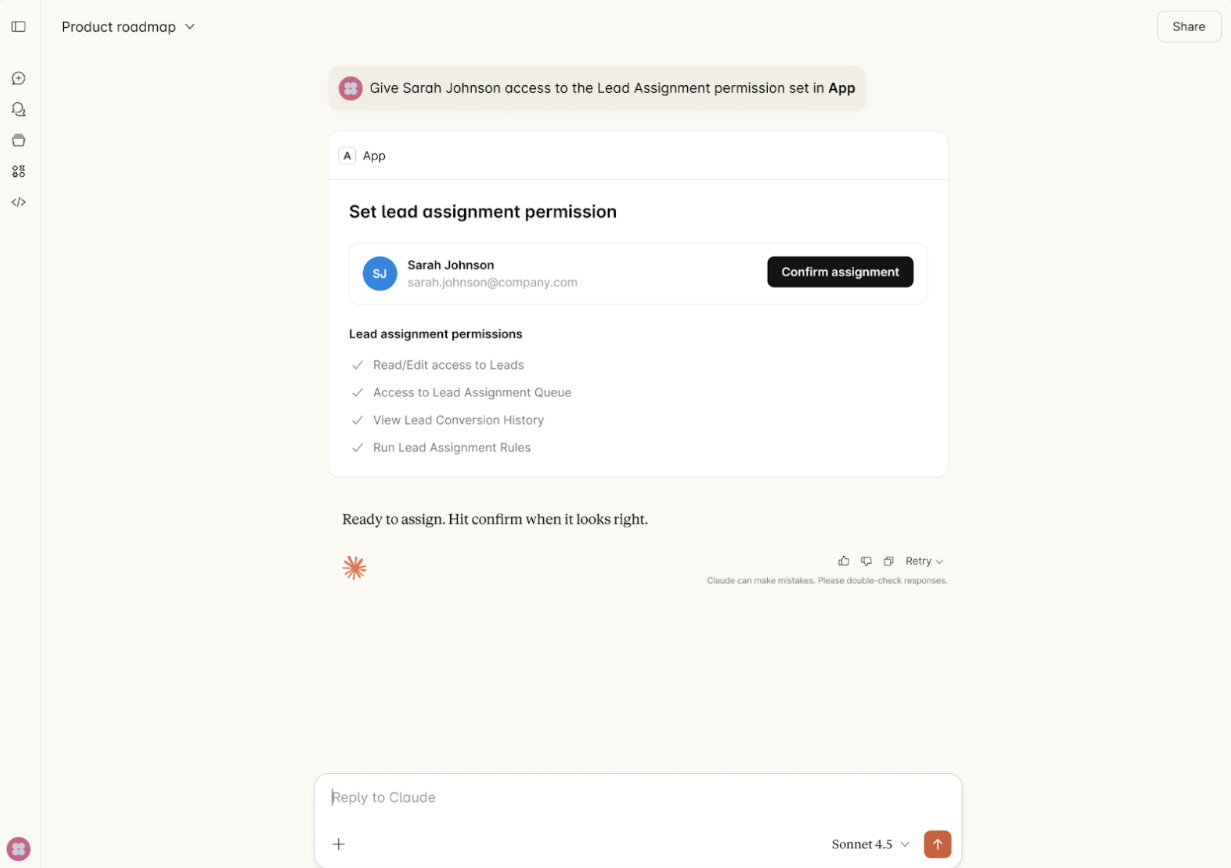
Once connected, you should be able to invoke the app by name:
Option 2: Chippy
Most vibe-coding tools aren’t built to help you understand MCP and ChatGPT apps. They’re great at building web apps, but they can’t create an MCP server, preview your tools, or help you connect to ChatGPT.
That’s why I decided to build one myself—Chippy. Chippy is an AI agent that specializes in prototyping ChatGPT apps. You can test your app with the built-in chat, connect to ChatGPT without worrying about deployment, and even generate a spec directly from your prototype. And you can spin up your first app completely free.
In this example, I’ll build an app that lets users search Maven Lightning Lessons (free 30-minute talks from experts on AI, product, and design).
The core features are:
Find me a relevant Lightning Lesson based on some topic
Display the recording of the lesson inline in my ChatGPT thread
Move the display to picture-in-picture mode to continue interacting with ChatGPT while the Maven video plays
To start, I’ll head to Chippy.build and ask Chippy to help me plan this project. Chippy suggests a single tool called find_lightning_lesson that takes a topic as input. It will then show an inline card to start, with an option to change to picture-in-picture.
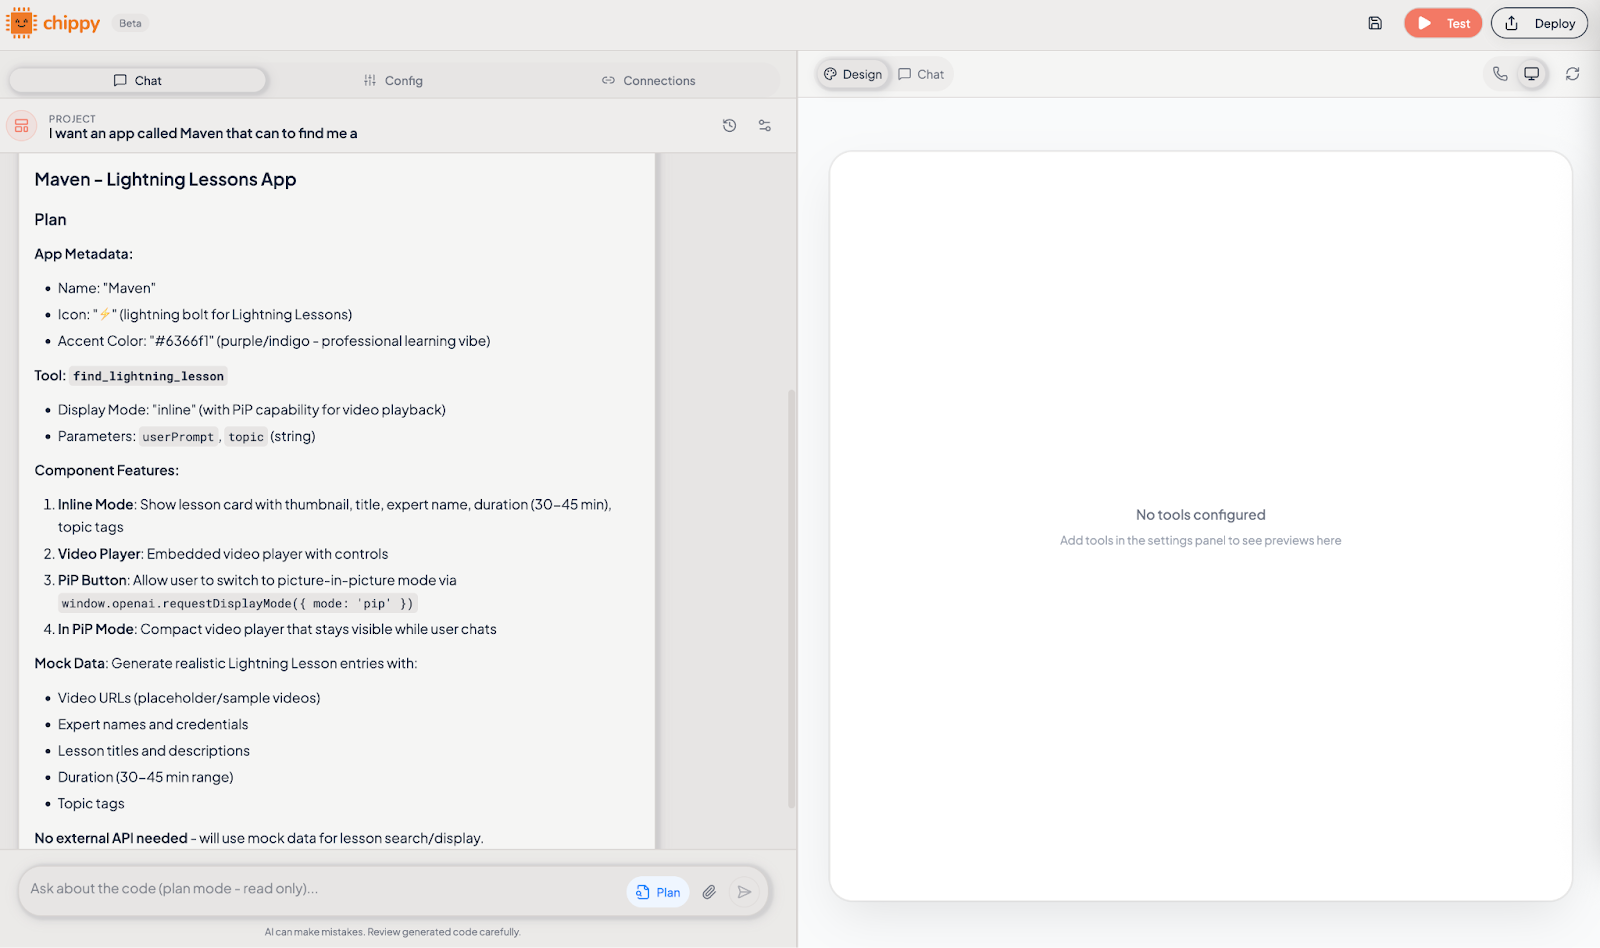
From here, we just need to tell Chippy to implement. We can then get a preview of our app and test how it will work inside a chat environment.
We now have a functional ChatGPT app ready to test. Before we continue, grab your app link with “Test” in the top right corner
To connect to ChatGPT, you will first need to enable Developer Mode on your ChatGPT account. From there, you can navigate to Settings -> Apps & Connectors -> New App.
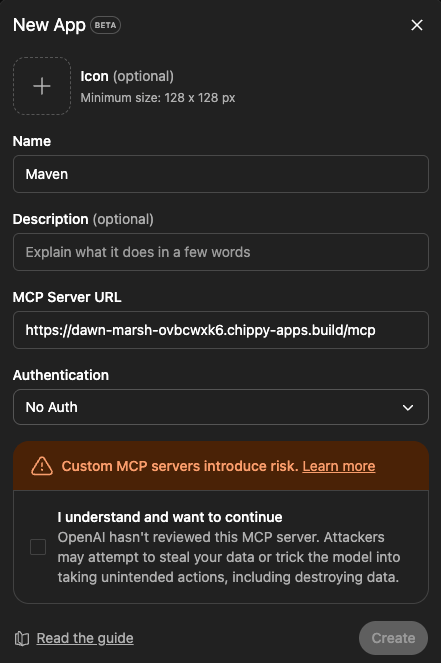
Add a Name, MCP Server URL, and set Authentication to No auth. Once you click Create, you’ve successfully made your first ChatGPT app!
The most reliable way to test your app is to mention it by name or tag it in your own chat. Below you can see that ChatGPT automatically tags your app if you mention it by name.
Once you have a functional app, you can continue to iterate and begin to build a golden set of prompts to trigger your app. You may want to add authentication, fetch real data out of your product, or build apps that use multiple tools together.
ChatGPT apps don’t have to be as simple as showing a video or displaying a card. You can build full, complex applications directly into ChatGPT. Here’s a quick example of a dungeon explorer game I built with Chippy. You can see that ChatGPT has context on my current level, information about the game, and can give me tips on improving my score.
The growth opportunity in front of you right now
 | A guest post by
|